Using [Images] Constrain and examples of Cropping versus Scaling for the Sizing Mode
Using [Images] Constrain and examples of Cropping versus Scaling for the Sizing Mode
When using the [Images] Constrain module, one of the most significant aspects to understand how to use this module successfully, is understanding the Sizing Mode option (parameter). This controls the primary method the module uses to size the source image(s) to fit within the constraints defined for your desired output image dimensions. In the following section we will take a look at the two distinct ways these modes work as each one provides a solution for different situations. Note that both modes work to maintain the proper aspect ratio for the image regardless of the chosen options. This prevents the original image from appearing to be squashed, stretched, or otherwise distorted from its original appearance.
Image Orientation and Aspect Ratio
Images can be categorized into three different types of orientation. The orientation is based on the width and height of the image dimensions. If the width and height of the image are exactly the same number of pixels, then the image is considered square orientation. If the width of the image is smaller than the height, then the image is considered to be portrait orientation. If the width of the image is larger than the height, then the image is considered to be landscape orientation. Note that with all of these descriptions and examples, we are always assuming the actual content of the image and its relative rotational position within the image are already accounted for and are not part of these.
| Portrait | Landscape | |
|---|---|---|
 |
 |
In this example above, we show two different images. We show a portrait image, which has an aspect ratio of 9:16. You can see that the portrait image is vertically oriented. We show a landscape image, which has an aspect ratio of 16:9. There you can see that the landscape image is horizontally oriented. (We don't show an example of a square image here as that should be obvious what that looks like.)
When we talk about aspect ratio, this relates to the number of pixels in the horizontal and vertical dimensions of the image. As long at the aspect ratio is preserved, when an image is resized, then the target image should look correct in relation to the original image. If the aspect ratio is not preserved, that is when you wind up with images that look stretched, squashed, or distorted in some fashion. Thus it is important to preserve the aspect ratio for the best visual results. In the following sections and examples, we are going to start each example with an obviously portrait and a landscape image, and the target image will always be a square image. This will provide us with good example cases as the starting and ending results are different enough it should be able to serve in understanding the differences in the options.
Visualizing The Action When Cropping an Image
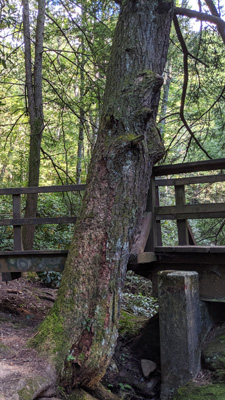
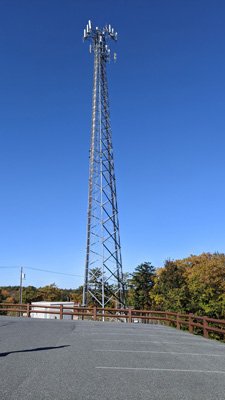
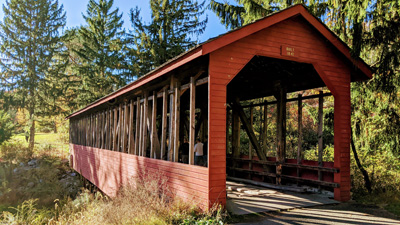
In this section, we will show a visualization of what happens with a source image when it is obviously a portrait or a landscape oriented image, and our target dimensions are going to be a square image. This type of situation commonly happens when you want to generate a thumbnail image for use on a web page to represent a given image. The source for our example portrait image is shown here.
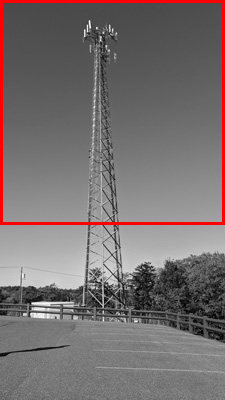
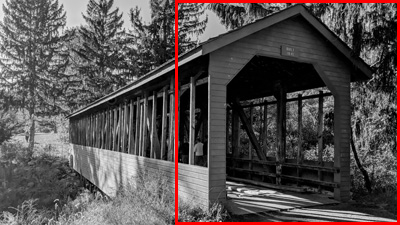
If we take this source image, and set the Sizing mode parameter to Crop and then specify a desired Width and Height dimension, such as 400 by 400, that would result in a square target image. By leaving the Source anchor parameter blank, or set to None, the output image will be taken from the exact center of the source image. The example below shows a version of the source image (converted to grayscale for visual clarity only), where the red highlight shows the exact portion of the image that will be fit to the output image. Thus, the red highlight is the cropped part of the source image.

This might be fine for most images, but in this example image, we see that there may be cases where you are working with a group of images where you know the most interesting content is not in the middle-center of the source image. In these cases, we take advantage of the Source anchor parameter and set it to a more appropriate value. In this case, we would set it to a value of Top and the crop area will be anchored to the top of the original source image. In this case, we would wind up with the crop area coming from the red highlight portion of the image shown here.
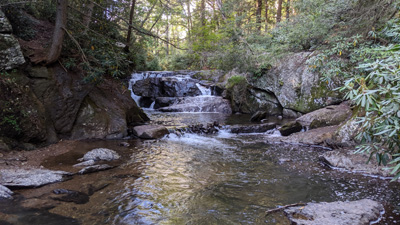
When working with a landscape image, the concepts are all exactly the same. We start with an example landscape image shown here.
Again, we take this source image, and set the Sizing mode parameter to Crop and the specify a square target dimension, such as 400 by 400. As we see again, if the Source anchor is not specified, it takes the cropped image from the middle-center of the source image. We can visualize this with the red highlighted area as shown below.

And also as in the previous example, we see there could be a set of images where the more interesting content is not always going to be found in the middle-center. In this case we would set the Source anchor parameter to a value of Right and the crop area will be anchored to the right of the original source image.
Again we see that cropping attempts to size the source image to fit over the entire area of the target dimensions. This can cause potions of the original image to be clipped off.
Visualizing The Action When Scaling an Image
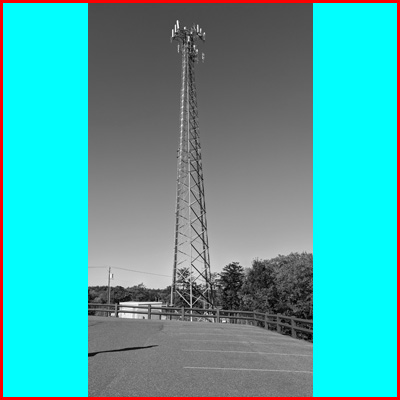
In this section, we will show a visualization of what happens with a source image when it is obviously a portrait or a landscape oriented image, and our target dimensions are going to be a square image when using the Scale option. This type of situation commonly happens when you want to generate a thumbnail image for use on a web page to represent a given image. The source images in this section will be the same as from the Crop examples. In the following examples, the red highlight color is illustrating the chosen target size again. But as you see from the example visualizations, the entire source image will be fit inside this virtual frame. It also helps to highlight the presence of the canvas. In these examples, the canvas color is shown as a cyan, or light blue.

Above we see in the visualization, whatever color is chosen for the canvas is used to backfill the area that will not be covered by a portion of the original source image, such that the target image size can still be rendered in the requested dimensions. Below we see how it differs for the portrait image once rendered.
And finally we see that scaling attempts to preserve as much of the source image while getting it to fit into the dimensional frame of the target specifications.